
- Best Archery Accessories 2024 - March 19, 2022
- Bow string:Why does it keep hitting my arm? - February 2, 2022
- Bow square: A how to guide - February 2, 2022
Using your bow for hunting needs a steady hand and sight you can rely on. Nevertheless, how does an archery sight work? There are so many different types available, and how should you use them? Fear not, as you can find all the answers for the above questions here on how to set up and use your bow sight. So why wait? Let’s jump right in and get started.
What are they?
The bow sight mounts on the bow’s riser to help you aim the arrow showing you where the projectile is pointed. While you can shoot your bow without a bow sight, it isn’t easy at longer ranges.
As a novice archer, you can be accurate when using a peep sight or a kisser button with quality arrow rest.
On the other hand, there are different bow sights available, and you need to know the difference before investing in one.
Single Pin Sights and Multi-Pinned Differences
There are two main types of bow sights used the single pin sight and multi-pinned sight. The single pin is a personal favorite for many archers and comes with one aiming pin. You can change it by adjusting a couple of dials to help compensate for a variety of distances.
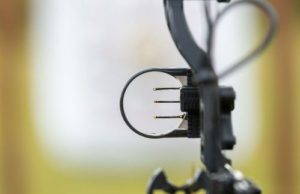
The multi-pin sights, also known as the fixed pin sight, have between three to five aiming pins compared to having a single pin. The pins are set up beforehand, and you cannot adjust or move them quickly.
For this reason, during the sighting, you need to change every single pin for a given distance. Once it is set up, the sight is ready to use. Each pin you use is accurately aimed at a wide selection of distances.
For example, with a three-pin sight, you have one pin aiming at 10 yards, the other at 20 yards, and the last one at 30 yards.
You can set up the pins at different yardages, but it needs to be set according to your ability as an archer and the distance the bow can shoot.
Making Adjustments
You need both accuracy (hitting where you aim) and precision hitting the same spot every time in archery. To achieve precision, you need the right equipment for your bow and good form. However, you only need to move your peep sight for accuracy until you hit where you aim.
When you shop for a bow, the pros typically adjust the bow sight, but it helps to sight it in yourself for shooting longer distances. The crucial thing is to have an Allen wrench set available, as you will be using it a lot.
The Adjustment Process
First, you need to decide the distance you want to shoot from 20 to 25 yards starting at the target. Now walk the distance away from the target using a rangefinder or measuring the correct length with a tape measure.
Now aim the bow at the middle of the target and shoot three similar arrows one at a time. Take your time to aim and carefully shoot them. The arrows should group close together. If this happens, remove the arrows and shoot one single arrow at the target.
If you find they are not grouping, something is not right with your shooting, or you need to check the arrows. However, if they did group well, adjusts the single pin sight towards that single arrow you fired first. For example, if the shot went left, change your single pin sight left. If it went down, adjust the peep sight down.
Now, look through the peep sight directly at the center of the target before sighting it in. Keep the bow still and move your sight where the missed arrow is on the mark. Now, remove the arrow and back out to the distance you chose and shoot another arrow at the center of the target.
The likeliness is that you shot it close this time around. If there is more tweaking needed, repeat the process to move the sight until you have lined up the yardage’s sight.
Targeting with a Compound Bow
To propel an arrow towards the target faster, the compound bow works with a set of pulleys compared to your conventional bow. Therefore, it is important to aim the compound bow correctly. Luckily, it is equipped with guides to help you with aiming.
Sighting the Shot
We will presume for this method that your compound bow is already in tune, and you will need your arrows, Allen wrench set, and mechanical release (optional) to provide a controlled and consistent release of the bowstring.
Before you begin, it helps to do an equipment check for loose parts, as you need to take every shot in the same way. Make sure to wiggle the sight and rest gently to tighten components as required on the compound bow.
Also, check the alignment between the bowstring, sight, and arrow. If you find there is a play, tighten up the screws using the Allen wrench.
Check if the arrows for damage from the practice point to the fletching. Now take up your stance position to sight your bow in at 20 yards depending on the type of sight you use.
Here we discuss using a multi-pinned sight. As discussed, each pin is set up for specific yardage. If you use a three-pin setup, it is 20, 30, and 40 yards.
Move the pins down to focus on the 20 yard pin that is the top pin and shoot at the target using the three-group method.
Once you can determine where the arrows consistently go, you can adjust the sight. When you move the sight down, it enables you to lift the bow for a higher shot.
While raising the sight, drops the angle of your arrow to shoot, lower. When pushing the sight left, your arrows will go to the right and vice versa when moving the sight right.
You need to make adjustments and keep shooting until the top pin is dialed, and you will not need to adjust the entire sight.
Now make your left/right adjustments by moving individual pins up or down to get the 30 yards zeroed in. Take a smaller wrench to move the 30-yard pin close to the top pin, and when ready, shoot.
Only move the pin to get it into place. Repeat the process to dial in the 40-yard pin by moving it up or down.
Mount Sights on a Recurve Bow
You can use three main types of sights on the recurve bow: pin sights, ring sights, and combined pin/ring sight. Each of them attaches to the bow in the same way but needs different methods to adjust to find the correct shot depth.
- Start by placing the bow on the side you want to install the sight facing upward.
- Now align it to face towards the front and line up the holes with the riser.
- Install the screws using an Allen wrench or screwdriver until tight but do not overtighten it.
- Use the string level to ensure your bow is level by adding supporting material at the lower side.
- Remove the level not to move the bow and place it on the pin sight to adjust it until level and fasten the pins to the riser.
- Modify the telescoping mounting to prevent straining the eyes when sighting the bow.
- Place an arrow from where you will fire your shots and sight it down the arrow to ensure it does not encounter the sight.
How to use
The sight used on a recurve bow is a long horizontal bar attached to a vertical bar with sight markings. The device has a removable block comprising an aperture of plain glass, a hole, or a pointer.
Some of them have wheels, while others have screws and mounts on the block on the riser. You insert the bar into the block, and it secures with a screw.
The crucial thing is to mount it closer as it allows for a bigger adjustment. The further it is you can make small adjustments to produce large changes.
For finer control, place it further out on the bow, but that can also take your shot way off. You can also adjust the vertical bar by loosening the screws and moving it up/down.
It helps when you want to adjust for close to long distances. You only need to do that if the sigh block does not accommodate the distance range.
Remember, when adjusting the horizontal range, the sight can obstruct your target, and best to check it first before making adjustments.
When measuring your sight, it helps to record the settings at a given distance for future reference. On the other hand, the best way to sight in the bow is that the sight picture needs always be consistent.
You can use the string as a reference, known as a string picture. When you are in the draw position, both the sight and string are visible to take care of the horizontal axis deviation.
No matter what method you choose, always use the same point every time. Lastly, always set the sight for grouping and not a single shot.
Adjust the sight to follow the arrow by moving the sight upwards, and if below the target, move it downwards. You do the same if it on the left or right by moving it in that direction.
Adjust Peep Sights Left and Right
As previously discussed, when you adjust sights on a bow, you stand as close to your target to shoot a group of three arrows to form a cluster. By doing this, it reduces human error when making adjustments.
If your arrows groups more to the left, then you need to move your sight left. The same applies when the arrows hit to the right. Always remember in which direction you need to move it for covering the whole group.
Another thing to remember is when shooting at a close distance; you need to make greater adjustments while further distances take smaller adjustments. If you use multiple pins, sight set the top one for close distance shots and the bottom one for longer distance shots.
When making a horizontal adjustment, always chase the arrow using your sight. Suppose it hits high; move the sight up and down if the arrow hits low.
Once you master this, you can start moving away from the target and keep shooting groups to adjust your sights pins in ten-yard increments to stop when the groups become inconsistent.
Crossbow with a Pin Sight
One of the most difficult things to do using a crossbow is sighting in a pin sight but not impossible.
- Start by moving away from the target 10-yards and make sure the range is clear before loading the arrow.
- Keep your crossbow pointed downrange, place the arrow, and shoot it at the 10-yard range.
- Take another shot from the same distance and then the third one with all striking the target in the same place.
- If you have a tight grouping, adjust the sight to the top center of the bullseye. Doing this helps to prepare for the final adjustment at 20-yards.
- Use the following the arrow method by moving it right if the arrows hit the target’s right and vice versa if it hits left, up, or down.
- Now shoot three more arrows, and if it is at the top center of the bullseye, move back to 20-yards.
Repeat the process and fine-tune the sight to the middle of the bullseye.
Final Thoughts
We hope that the information on how to sight in your bow helps you find a suitable method to achieve the best results. It is best to start at the 10-yard line for safety. Once it hits the center, you can start moving back to the 20-yard mark. As you can see, sighting in a bow is similar for different bows when it comes to archery.