
- Best Archery Accessories 2024 - March 19, 2022
- Bow string:Why does it keep hitting my arm? - February 2, 2022
- Bow square: A how to guide - February 2, 2022
When I decided to master archery, the first challenge I set for myself was learning to aim without using sights. It’s an ancient shooting style that’s become increasingly popular among archers, and I was drawn to it. This skill transformed my approach, allowing me to hit targets with the precision of a professional, just like the medieval archers in Europe, the ninjas of feudal Japan, and the Native Americans.
As I honed this skill, I noticed my hunting became faster and more efficient. My movements and skills were sharper, more instinctive. I realized that if I wanted to advance beyond just being an average archer, I needed to embrace instinctive archery fully.
So, how did I achieve this? Well, I’m excited to share with you the step-by-step guidance that helped me. And if you’re curious about other aspects of archery, like the top bow sights and accessories, be sure to check out my other pages for more insights.
Instinctive archery with a Recurve Bow
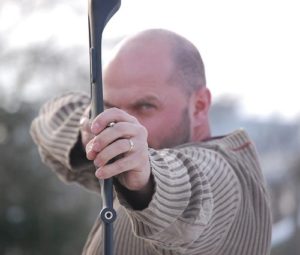
I’ve always been fascinated by traditional archery, which is really a journey back in time, thousands of years to the roots of aiming-by-not-aiming. It’s about mastering the Longbow, Recurve Bow, or even a classic wooden bow, all without the aid of modern bow-sights like peep sights, pin sights, or scopes.
I’ve noticed a resurgence in interest among archers in this ancient method, known as instinctive archery. It’s a beautiful dance between the archer, the bow, and the arrow, demanding a blend of practice, skill, and innate talent. Embracing this technique, I’ve learned to shoot as archers did in days long past. It’s remarkable to think that there are ways to practice even without a bow.
Picture the thrill I feel when I release an arrow over 50 yards and watch it strike exactly where I intended, all without any optical assistance. The sense of achievement is indescribable, and with each practice session, my skills sharpen even more. Most traditional archers I’ve talked to believe that this is the purest way to begin your archery journey.
In my exploration, I’ve discovered two primary styles that define traditional archery: Gap shooting and instinctive archery. The debate amongst purists is lively – some argue that gap shooting isn’t a part of instinctive archery, while others, including myself, see it as an integral part. Instinctive archery is intuitive – it’s about seeing and shooting, feeling the shot more than calculating it. Gap shooting, on the other hand, involves closing one eye and aligning the arrow, which I found to be an instinctive action in itself, especially as a beginner. It’s fascinating to delve into these different styles and discover their unique applications in the broader tapestry of traditional archery.
The importance of your Stance
When I first took up archery, I quickly learned how crucial my stance is. To get it right, I stand at a 90° angle to my target. This means the target aligns perfectly with the outside edge of my non-dominant foot. As a right-handed archer, it’s the outer edge of my left foot that points the way. This position puts me sideways to the target, an orientation that felt awkward at first but now feels natural.
Moreover, I make sure to place my feet at least shoulder-width apart, creating a stable base that’s essential for every shot I take. This stance, I’ve found, is the foundation of every successful archer’s skill set.
Consistency of your shot sequence
Having a consistent shot sequence leads up to making the best shot without using sights. These include:
- Checking if your stance is right
- Nocking the arrow
- Drawing the bow to the anchor point
- By looking at the exact spot on the target you are aiming at
- Releasing the arrow
- And finally following through with your shot
You need to develop a shot sequence, in the same way, every time. Furthermore, you need to do it in the exact order before making every shot. Eventually, it becomes second nature in the subconscious mind with time.
Gripping and drawing the bow
When I first picked up my recurve bow, I had to learn the right way to grip and draw it. I learned quickly that gripping the bow too tightly was a mistake. Instead, it should lightly rest on the top of my hand, almost as if the bow is merely balancing there. Regularly, I check to ensure I’m just gently supporting the bow, not squeezing it.
Then, there’s the draw handgrip, which is just as crucial. I use my index, middle, and ring finger for this. Sometimes, I place my index finger above the arrow and my middle and ring fingers below, but other times, all three fingers sit underneath the shaft. Especially when I’m gap shooting, I prefer all three fingers under the arrow, bringing it closer to my eye for easier aiming.
One vital tip I’ve learned is to draw the bowstring just past my fingertips, but not so far back that it digs into the joints of my fingers. If I do that, my release becomes jagged and throws off my shot. It’s become clear to me that mastering the art of shooting a bow without a sight hinges on consistent practice and fine-tuning these subtle techniques.
Gap Shooting With Your Bow
When I first delved into shooting my bow without a sight, I started with gap shooting. This method revolutionized the way I aim. I align the point of my arrow directly with the target, a process that really tests my judgment of distance. It’s all about figuring out how far above or below the target I need to aim. Archers call this the “point on” technique. When I’m “point on,” I know I’m standing at just the right distance to make my shot count.
But here’s a key insight I’ve gained: each bow has its own unique “point on” distance. For some, it might be dead on at 30 yards, while for others, it could be as far as 60 yards. The only way I found my bow’s sweet spot was by experimenting with distances, moving further from or closer to the target. I’ve observed that when I aim directly at the bullseye, the arrow arcs gracefully upward before descending to strike the target. Mastering this technique has been a game-changer in my archery practice.
Therefore, when you are close to the target, you need to aim your arrows lower and further away the aiming is above the target. Here is how you can work out your gaps:
- Start by using three of the same type of arrow by shooting them one at a time 10-yards away. Measure how far off the arrows is from the bullseye in inches and make a note.
- Move back 20-years and repeat the process, making notes of each measurement.
- Repeat the process until you reach the 50-yard point.
By calculating the distance, you can determine how far off you are from the target. For example, if you are off at 15-inches, standing 10-yards away from the target then aim 15-inches above the goal instead of directly at it. Furthermore, if you plan to use the gap shooting method, it is best to use long arrows.
Aiming Tips
When I began practicing gap shooting, one of the first things I did was use a pin sight. It might sound counterintuitive, given that gap shooting is all about shooting without a sight, but hear me out. The pin sight became an invaluable tool for me to observe and memorize the gaps. During my practice sessions, I’d focus intently through the bow sight, noting the subtle differences and alignments. Then, as a crucial step, I’d remove the optic and try to replicate the shot, relying solely on my estimation of the gaps.
Over time, this method significantly honed my gap shooting accuracy. I also discovered another trick that’s especially helpful for beginners like I was: extending the index finger of my bow hand towards the target. This little gesture made a big difference. It not only guided my aim but also helped align my fingers below the arrow with the target. This trick, simple as it may seem, became a cornerstone in improving my aiming technique.
Anchor Point
The anchor point is where your bowstring and draw hands are when making a full draw. For the majority of archers’, it can be the corner of his or her mouth, cheek, or chin.
See and Shoot
When I first tried the instinctive archery method, it was like tapping into a primal instinct. It’s similar to the way you might throw a ball without consciously aiming – it just naturally finds its way to the target. I often think about how I throw a ball to someone; I don’t calculate the trajectory or consciously aim. Instead, the ball instinctively goes in the intended direction.
This instinctive approach is all about trusting my muscle memory, much like when I play the drums. Just as I can move my limbs in harmony while maintaining rhythm on the drums, I’ve trained my muscle memory to improve my archery. But I won’t lie – mastering this ‘see and shoot’ technique took much more practice than gap shooting and even years to perfect.
Many people advise focusing on the target, but I’ve learned that’s just a part of the puzzle. Real precision and consistency in archery come from perfecting my shot sequence and training my eye not to fixate on the arrow, but on the exact spot I want to hit. Every time I draw the bow, I focus intensely on that small spot, not the entire target.
This focused approach has helped me avoid the common mistake many hunters make – missing a shot that’s only a few yards away. By concentrating on that bullseye and maintaining my focus until my arrow strikes it, I’ve trained my subconscious mind for accuracy in every shot, whether in practice or in the field.
What’s crucial, though, is incorporating exercises that improve both gap and instinctive shooting. These exercises have become a vital part of my routine, enhancing my skills in both techniques. This dual approach has not only made my archery practice more versatile but also more enjoyable and effective.
Training Exercises for Gap Archery:
- Stand on a 10-yard range and shoot dozens of arrows at the target using the gap between the arrow point method
- Do this until your arrows group closer to the center of the target
- Once your shots group, move back another 15 yards and further by repeating these steps
The crucial thing is that once you have mastered the shot from 20 yards, you need to start mixing it up and shooting at different distances.
Training Exercise for See and Shoot:
- Start by taking a Styrofoam cut and attaching it to the target with the open side facing you
- Stand back 3-yards away and start shooting by looking at the center of the cup
- Keep shooting at this distance until your arrows group into the middle of the target
- Once you achieve this, you start moving back to five yards, and so on
- Alternatively, you can also do 3D shooting as well
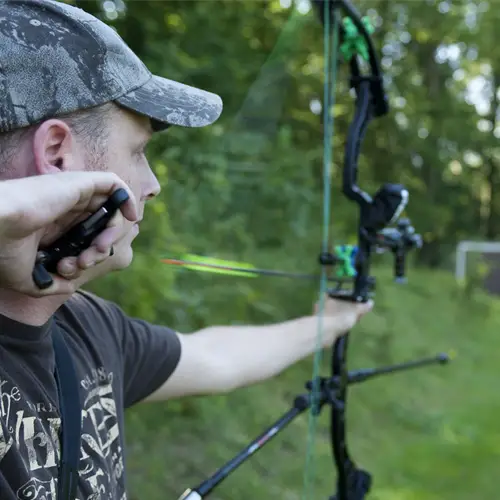
Compound bows
Aiming a compound bow involves similar skills as using a recurve bow, but it is important that your bow is properly aligned and set up properly. All of the tips mentioned above can also be helpful for learning to aim a compound bow without sights too.
I recommend you learn both methods as both are helpful to use in various situations.
Final Thoughts
When I first started shooting my bow without a sight, I won’t lie – it was tough. But as I kept at it, I noticed something amazing happening. I was gradually mastering it, getting better each time. So, I decided to fully embrace instinctive shooting, leaving the sight behind. It’s taken a lot of practice to get to where I am now in this mystical art form. Many archers rely on scientific methods, but I’ve found that by following the steps I’ve shared, anyone can reach expert level.
The most incredible part of this journey has been seeing how my body adapted. Now, I can quickly hit targets at varying distances, relying solely on my bow and my instincts. It’s fascinating to realize the capabilities of my body, especially the importance of consistently anchoring at the same point. This consistency has not only improved my accuracy but also deepened my connection with archery.